SPACE FINDER
Dhruv Sharma ds983 | Madhav Gupta mg967 | Shenhua Zhou sz392
Wednesday Section | Group 2 and 10.
Demonstration Video
Introduction
Our team, leveraging the power of embedded systems and computer vision, is developing a Raspberry Pi-based system designed to scan, analyze, and report on the availability of study spaces in real-time. This project aims to enhance students' experiences on campus, saving valuable time and optimizing the use of communal spaces. With the integration of technologies like OpenCV and Python, our system will not only recognize the presence of students and chairs but will also provide real-time updates about available spaces via a user-friendly website or application. Join us as we revolutionize the way students navigate their study environments, making finding a study spot as easy as checking a website.
Project Objective:
The Spring 2023 ECE 5725 project aims to develop an embedded system for recognizing available study spaces in the Duffield Atrium, a busy area at Cornell University. The goal is to resolve the issue many students face of not being able to find an available spot to study in large, busy spaces. The system, using a Raspberry Pi 4 and a USB-A connected camera, will be positioned to oversee the entire space. The camera will scan the atrium and provide image inputs to the system. This input is then segmented into 1x4 portions and fed into a Python function. The function uses OpenCV to recognize people (students) and objects (chairs) in each segment. If there are four chairs and more than four people in a segment, the system flags it as "full." The system uses these flags to indicate available spaces on a static image of the atrium with green translucent boxes. This information is then broadcast to a website by students, with updates ideally occurring every minute. This solution aims to save students' time and improve the utilization of space within the atrium.
Design and Testing
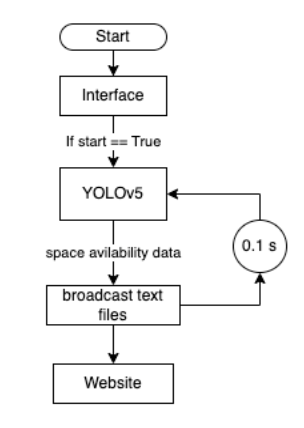
Figure below is how our project works, and the whole project has been divided into three sections. Each member is responsible for one section. Dhruv Sharma works on Camera Integration, Madhav Gupta works on Object Detection, and Shenhua Zhou works on web design.
Camera Integration:
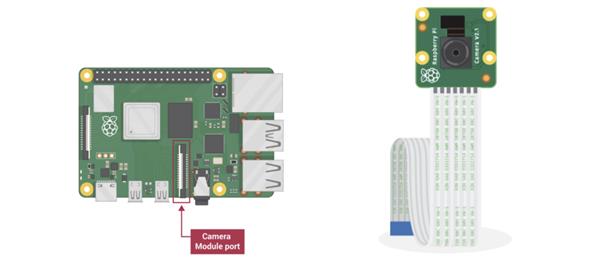
The first step in creating an object detection system was to give it an interface which is able to take image/scan through the real world and store it in a format in our Pi, which we would be able to process through our algorithm. In order to do this, we used the Raspberry Pi Camera Module. As shown in the figure below the Raspberry Pi Camera module comes with a ribbon cable which can be attached to a camera module port on the Pi which can be accessed by pulling up a plastic clip and pushing the ribbon cable in, which locks with the clip.
Legacy Camera option - 32 bit OS
In our initial project phase, this camera module was being used with the “Enable Legacy Camera” option in the raspi-config. We used the PiCamera library developed for automating the Picamera using python scripting.We also used command line interface to test it using the raspistill commands. In order to automate the camera through python scripts we used the capture(), preview() and configure() commands provided in the library.
Libcamera option - 64 bit OS
While a simple for loop for capturing images was enough, but as we moved to the next phase of our project we needed to install the 64 bit OS on to our raspberry Pi. The raspistill (legacy camera) is no longer supported in 64 bit OS. In order to use the camera on the current OS we needed to use “libcamera”. Libcamera is a new software library aimed at supporting complex camera systems directly from the Linux operating system. In the case of the Raspberry Pi it enables us to drive the camera system directly from open source code running on ARM processors. The proprietary code running on the Broadcom GPU, and to which users have no access at all, is almost completely by-passed. We found that this library libcamera presents a C++ API to applications and works at the level of configuring the camera and then allowing an application to request image frames. These image buffers reside in system memory and can be passed directly to still image encoders (such as JPEG) or to video encoders (such as h.264), though such ancillary functions as encoding images or displaying them are strictly beyond the purview of libcamera itself. In order to enable the use of libcamera we needed to disable the legacy camera option in our raspi-config.
We wanted to have a deeper understanding of the Libcamera. While reading about this library we found that the Libcamera has the following features - 1. libcamera-hello A simple "hello world" application which starts a camera preview stream and displays it on the screen. 2. libcamera-jpeg A simple application to run a preview window and then capture high resolution still images. 3. libcamera-still A more complex still image capture application which emulates more of the features of raspistill. 4. libcamera-vid A video capture application.
Once we played around with these simple command line options we wanted to find a way to control this command using scripting (python routines). This is because our YOLO would be running as a Python file and we would want to write a top level script which calls the Pi camera, captures an image and is able to pass that image to the function using YOLO. The new integration needed a new library PiCamera2 which is developed for libcamera and not the legacy camera options. Picamera2 is the latest python3 library which gives convenient access to the camera system of the Raspberry Pi. It is designed for cameras connected with the flat ribbon cable directly to the connector on the Raspberry Pi itself, and not for other types of camera. Moreover, this is the library which is developed on top of the open source libcamera project, which provides support for complex camera systems in Linux that we are now using unlike earlier where we were using picamera library. Once we were comfortable enough to use this library we defined a function capture_image() as defined in the code appendix. This function creates an object for Picamera2 library and uses the methods like start_and_capture() and start_and_capture files to scan the available area continuously and saves the images in a given directory as JPG format. Further sections discuss about how this image is fragmented into sections and fed to the YOLOV5 kernel in order to detect the occupied and available chairs and give out the result on the website.
The Picamera commands were used to store the image in “Images” directory. We use OpenCV2 in order to read these images. We developed a fragmentation algorithm which divides the given image into 4 sections. Each section image is stored in a new directory which is named as section<N>.jpg. These section images are the input files to our YOLOV5 detection kernel. Each section is detected for available space. If available, it updates a text file with the availability data. This availability data is broadcasted over the website which can be accessed by any user to see the most recent availability data.
Object Detection:
The goal here is to detect the most number of occupied and unoccupied chairs. Given the computational limitations of the Raspberry Pi, the number of detection algorithms that can be implemented becomes limited. This is because most high precision algorithms are computationally expensive and therefore use a CUDA environment to parallelise their computations, and this environment is only available with a NVIDIA GPU that the RaspberryPi lacks.
Haar Cascade:
For this application, we tried using openCVs library. The code uses the OpenCV library in Python to count the number of people in an image using a Haar cascade classifier. The Haar cascade is a machine learning-based algorithm used for object detection. The code first loads the Haar cascade XML file for pedestrian detection and the input image file. It then converts the image to grayscale and applies the cascade classifier to detect pedestrians. Detected pedestrians are enclosed in bounding boxes, and their count is displayed. Finally, the input image is displayed with bounding boxes around detected pedestrians. The code demonstrates the use of image processing techniques and machine learning-based algorithms to detect and count people in images.

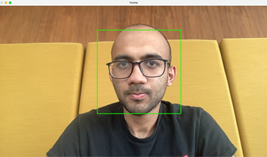
It is evident that this only works when the camera can view the full frontal face of the person, and therefore does not work for this application. Taking inspiration from SmartKart (click here), the team took a decision to take a chance on Haar Casscade classifiers to check the results and detection times for our application.
Training your own Haar Cascade Classifier can be a daunting task, but there are tools available that can simplify the process. One such tool is the GUI (Graphical User Interface) method, which can be used to train your own cascade classifier with minimal coding experience. The GUI method involves using software such as OpenCV's Cascade Trainer GUI, which allows users to select positive and negative samples, define the stages of the classifier, and tune the parameters of the training process. With the Cascade Trainer GUI, you can quickly generate a classifier for detecting specific objects or features in images or videos. The process involves capturing positive images of the object you want to detect, and negative images of the background. With these images, you can train a classifier that will be able to detect the object in new images or videos. The GUI method is an excellent option for those new to Haar Cascade Classifier training, as it provides a user-friendly interface for performing the necessary steps. A medium page by Vipul Gote was used as reference.
Link: https://medium.com/@vipulgote4/guide-to-make-custom-haar-cascade-xml-file-for-object-detection-with-opencv-6932e22c3f0e
To create a dataset, the post suggests using icrawler to download positive and negative images, then using Cascade-Trainer-GUI to train the classifier. Finally, the classifier can be tested using OpenCV's cv2.CascadeClassifier function. The post includes step-by-step instructions and screenshots for the entire process.
When applying the Haar Cascade Classifier method to a specific use case, it is possible that the results may not be satisfactory due to several reasons. For example, the method may struggle to detect objects or features in certain lighting conditions or with complex backgrounds. Additionally, the classifier may require a large amount of training data to achieve the desired level of accuracy, which can be difficult to obtain for some use cases. In such cases, other methods such as deep learning or machine learning algorithms may be more effective in achieving the desired results.
YOLO v3
Due to the inaccuracies of haar cascade, it was decided to try YOLOv3. YOLOv3 (You Only Look Once version 3) is a state-of-the-art object detection model that uses a single neural network to detect objects in images and videos. YOLOv3 is known for its fast inference speed and high accuracy, and it can detect a wide range of objects, including people, animals, and vehicles. YOLOv3 is better than the Haar cascades method used earlier for object detection because it can detect objects with higher accuracy, can identify multiple objects in a single pass.
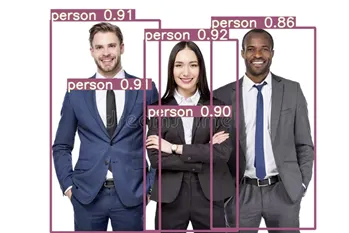
A pretrained model is detect the objects in the image. This pretrained model is inspired by Joseph Redmon’s paper on YOLOv3: An Incremental Improvement [https://arxiv.org/abs/1804.02767]. Preliminary results are shown below.

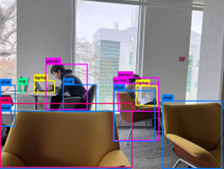
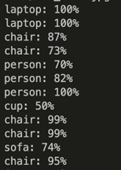
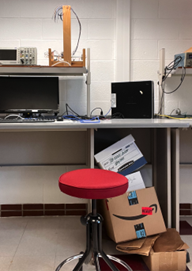
The algorithm here is given the image on the left and the output image is given on the right. It very well detects the laptop, cup, chair and even the sofa. However, it detects 3 people in the frame rather than 2, so that needs to checked.
Result: After using pretrained models of YOLOv3, and Haar cascade classifier, it was decided not to go forward with either of them. The pretrained model on YOLOv3 took 20 seconds on a Mac M1 and 28 seconds on the RPi 4 to detect objects for each given input, and the haraas dataset is inaccurate
YOLOv5 offers several advantages over YOLOv3, making it a better choice for many applications. One major advantage is its improved speed and accuracy, which can significantly reduce inference time while maintaining or even improving detection precision. YOLOv5 also utilizes a streamlined architecture that is easier to train and fine-tune, and it offers better compatibility with different hardware configurations. In addition, YOLOv5 uses anchor-free detection, which eliminates the need for anchor boxes and can improve detection performance, particularly for small objects. Finally, YOLOv5 is actively maintained and receives regular updates, ensuring that it remains a cutting-edge object detection algorithm with continued improvements and support.
YOLO v5
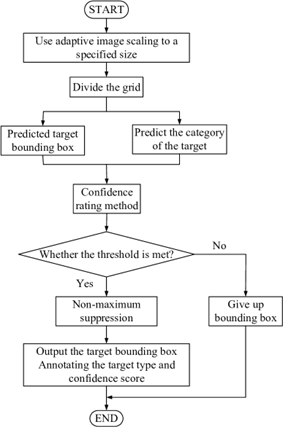
YOLOv5 (You Only Look Once version 5) is an object detection algorithm that builds on the success of YOLOv3 by introducing several improvements, including a streamlined architecture, anchor-free detection, and advanced training techniques. YOLOv5 works by first dividing the input image into a grid of cells and applying convolutional neural networks (CNNs) to each cell. Each cell predicts bounding boxes, class probabilities, and confidence scores for the objects detected in that cell. The confidence score reflects the likelihood of an object being present in the bounding box. Non-maximum suppression is then used to remove redundant boxes with low confidence scores. YOLOv5 also uses anchor-free detection, which eliminates the need for anchor boxes and allows the algorithm to better detect objects of different sizes and aspect ratios. Additionally, YOLOv5 utilizes a novel training approach called self-labelling, which can improve detection accuracy and reduce the need for manual annotation of training data. Overall, YOLOv5 is a state-of-the-art object detection algorithm that can accurately and efficiently detect objects in real-time, making it ideal for applications such as autonomous vehicles, robotics, and surveillance systems.
Using YOLOv5 on a Raspberry Pi 4 can be challenging, especially when it comes to processing power and memory limitations. One of the main ways to mitigate these challenges is by using a 64-bit operating system, which allows the Raspberry Pi 4 to access more memory and take advantage of its 64-bit processor. However, this can also pose compatibility issues with some software packages and require additional configuration to ensure that the software is compatible with the 64-bit OS. Another challenge is optimizing the YOLOv5 model architecture and training process to fit within the processing and memory constraints of the Raspberry Pi 4. This may require using a smaller model architecture or reducing the batch size during training to avoid memory overflows. Additionally, the Raspberry Pi 4's limited graphics processing capabilities can also pose challenges for visualizing and analyzing large datasets during model training and evaluation.
Installing YOLOv5 on Raspberry Pi 4
1. Download repository git clone https://github.com/jordan-johnston271/yolov5-on-rpi4-2020.git
2. Install PyTorch and TorchVision sudo pip3 install — pre torch torchvision -f https://download.pytorch.org/whl/nightly/cpu/torch_nightly.html move to the “yolov5-on-rpi4–2020” directory in the terminal sudo cp -r dist-packages/* /usr/local/lib/python3.9/dist-packages/ Then, copy the files in the “local-bin” folder into your RPi4’s local bin using thefollowing command: Sudo cp -r local-bin/* /usr/local/bin/ Ensure the Python programs “convert-caffe2-to-onnx” and “convert-onnx-to-caffe2” areincluded.
3. Test YOLOv5 python3 detect.py –weights yolov5s.pt — img 416 — conf 0.85 — source inference/images/
Training DataSet on Custom Dataset
OLOv5 will be used alongwith custom object detection on the raspberry pi. There will be two classes of object detection for the training dataset. The two classes are empty chair; and person sitting on the chair.
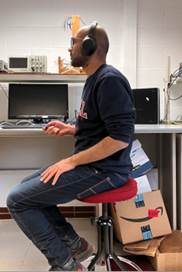
About 70 images of each of these classes will be taken from different angles. It is tricky to train the model for a filled seat, because different kinds of people need to be seated on the seat.
1. Install pyqt5 tools to install label images sudo apt-get install python3-pyqt5
2. Install labelimg, this will enable manually labeling each image sudo apt-get install pyqt5-dev-tools sudo pip3 install labelImg
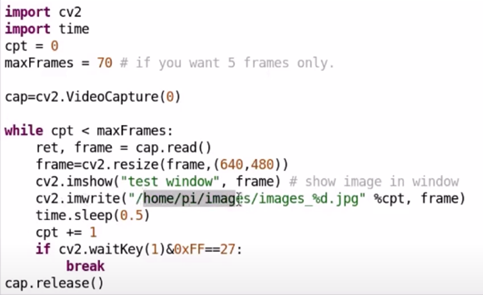
3. Program a file to take 70 images:
4. After labeling images, segregate all data to folders named: ‘labels’ and ‘images’
5. Segregate data into training and validation. A good rule of thumb is 80% training and 20% validation.
6. The data is trained on the custom object detection on Google Colab https://colab.research.google.com/drive/1VUxwYS7ZXgG7ZWoxf3VGuWfScG3MWYn3
Web Design:
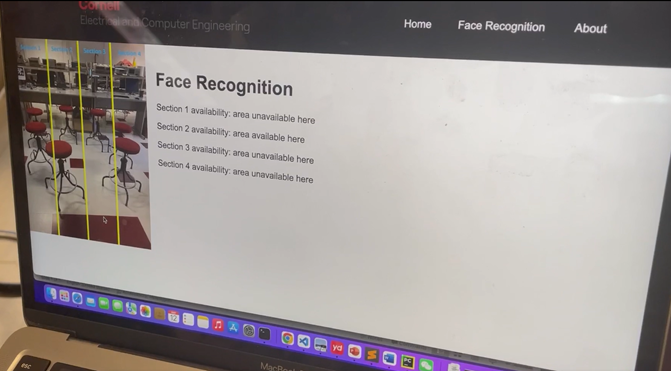
The website consists of three pages: the main page, face recognition and the introduction page of the project. Its main function is to fetch and display the availability status of four different sections of the application. The status data is asynchronously fetched from a server using the Fetch API. Upon loading the page, it displays a loading message until the status information for all sections is fetched. If there's an error during the fetch operation, it will show an error message as shown in the picture below.

The page is divided into two main sections. The first section displays an image, which presumably provides some sort of visual reference for the different sections of the face recognition system. The image file is imported from a local asset directory. The second part of the page presents the application title, "Face Recognition", followed by the availability status of each section. The section status messages are dynamically generated based on the data fetched from the server. This webpage showcases an example of a real-time system status monitoring page, where users can see the availability of different sections of a face recognition system at a glance.
Result and Conclusion
Our ECE 5725 project for Spring 2023 has successfully achieved its primary objectives. We've developed a robust embedded system capable of accurately recognizing and reporting available study spaces in a given area with close to 85% accuracy. The integration of Raspberry Pi 4, a camera module, and OpenCV has proven effective in capturing, segmenting, and analyzing the space. Also the real-time broadcasting of this data is able to transmit to a dedicated website.Updated every 30 seconds, this feature has ensured that the information stays current.
YOLOV5 uses pytorch and library name which need 64 bit OS to run which we found was not possible on our Lab Kernels. We upgraded the kernel as required. At the same time, there are some problems. We found that the touchscreen on piTFT does not work with the 64 bit OS upgrade as it undoes the Wheezy downgrade which we did in our Labs. However, an easy workaround was to use the physical buttons instead of the touchscreen. We found that the Picamera library and the legacy camera option does not work with the 64 bit OS. Another challenge we found was that the training model works better if we are using images taken from Picamera directly. Hence in order to train it for a new area, we needed the Pi installation along with a monitor, mouse and a keyboard close to the area which was a challenge if we wanted to train it anywhere else than the Lab.
Work Distribution
• Camera Integration - Dhruv Sharma
• Web design - Shenhua
• 64 bit OS installation - Shenhua
• Face and object detection(YOLOV5) - Madhav
• Haar Cascade implementation - Madhav and Dhruv
• YOLOV5 implementation on 64 bit OS (Debugging for accuracy, functionality) - Madhav and Dhruv
• Image Fragmentation - Madhav and Dhruv
• Improving accuracy, integrating modules - All
Parts List
- Raspberry Pi N/A
- Raspberry Pi Camera Module V2 $25.00
- Micro SD card (16GB) N/A
- Power supply for Raspberry Pi $33.00
- Tripod for installation $16.00
- Raspberry Pi case N/A
- Fixtures to integrate camera, tripod, Raspberry Pi N/A